DOs & DON’Ts OF RECORDING VOCALS AT HOME
With the increasing trend of building home studios, almost 90% of the artists I work with record their vocals at home. If you’re an experienced performer or are just starting out, I believe this list of techniques/tips will help you get better recordings on your next session
DOs:
Think about what type of mic will be best for your recording
Home studios usually have either dynamic microphones (like the SM58) that are very durable but don’t have the best definition, and condenser microphones (like the AT2020) that have a really crispy and defined sound but tend to be more expensive and delicate. This is a very general statement but if you’re aiming for an “industry standard” vocal sound, it’s best to go with a condenser microphone. You can get a good sound from a dynamic microphone but you will have limited options as to where your vocals can go in terms of quality of sound.
Consider the room you’re recording in
Your microphone picks up your voice and your surroundings so it’s really important that you’re recording in a quiet space away from reflective areas (like a window or a parallel wall). Believe it or not, closets are great, isolated spaces that will allow you to get a clean vocal. If you record and there’s a slight noise, it will come up in the recording once the audio it’s processed and mixed.
Use a pop filter
These are used to diminish any plosives from words that start with P, B, or T. Every word starting with plosive letters brings a big ball of air directed at the microphone, pop filters help with that. If you can’t get one right now there are a few online resources for DIY ones.
Prepare the session in your DAW before recording
When recording your own vocals, you’re doing the job of 3 people (performer, engineer & producer), so do your best to leave the session as ready as possible so when you’re recording you don’t have to stop because of technical issues and ruin the vibe. Create all the tracks you need, set up reverbs/delays, prepare looping sections, if possible get everything ready so you only need to press 1 button to record.
Listen to the recording to make sure there isn’t unwanted noise
Sometimes your gear plays tricks on you so always double check your recording to make sure there aren’t any clicks or pops or breaths cut in half. The sooner you find out about these issues the easier it will be in the future.
DON’Ts:
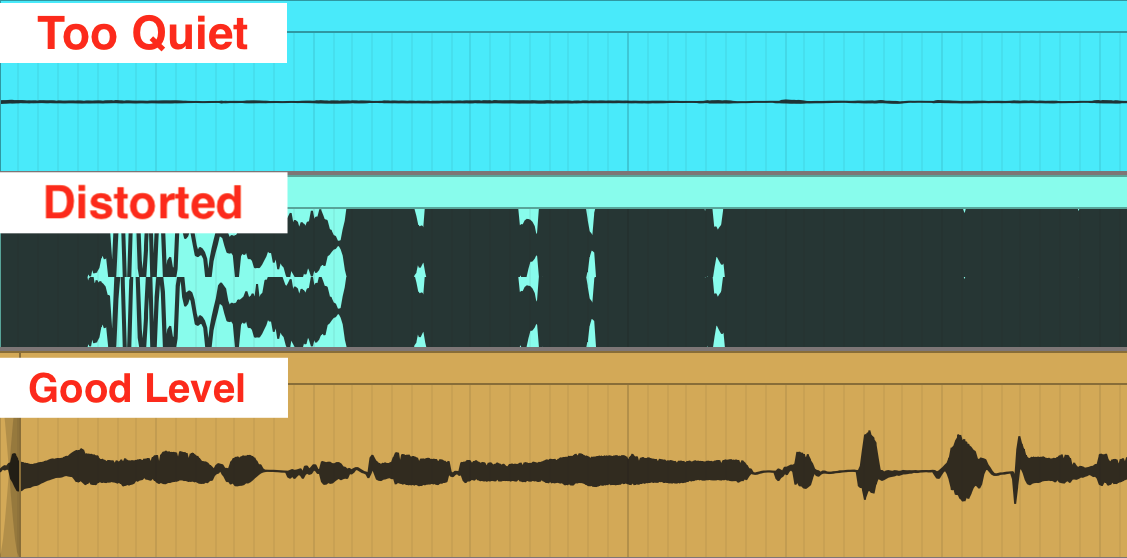
Don’t forget about the input level
Before recording any official takes it’s important to test the level your microphone is recording at. Some interfaces have meters and all DAWs show a level bar that displays how loud the incoming signal is. If the recording is too quiet, you’re likely to pick up the room noise, and if it’s too loud, the signal will be distorted. So stay “in the middle”
Don’t print overlapping parts into one file
This one is pretty self explanatory. When your producer/engineer gets your vocal takes they will separate the vocals by section and if there’s a chorus-verse passage with overlapping vocals they won’t be able to separate that and process the vocal individually. It’s best to send the takes in separate files.
Don’t record when you’re not feeling ready
Bear in mind that what you’re recording is yourself, it’s not a piano or a drum machine where your feelings might go unnoticed when you record. It’s essential to have the best mindset when you’re recording because if there’s no energy or weight in what you’re singing/rapping, the song might lose all the emotion. Try to learn what are the optimal conditions for you to record so you can get the best takes.
Don’t forget about the proximity effect
It’s simple, the closer you get to the microphone the deeper your voice will sound. Try to picture in your mind how you want your voice to sound when you’re recording and use this effect to your advantage. If you move around while you’re recording it will be noticeable, so try to keep the same distance from the mic on each take, unless you’re looking for an uneven sound as a creative choice.
Bonus Question: How many takes are enough?
There isn’t really a solid number of takes but I recommend you stay within the range of 2-7 takes. Even if you think you got the golden take on the first go, record another one just in case. I don’t think recording more than 7 takes is good because your voice will be tired and the quality of the takes won’t be consistent. When you send over your vocal takes, help the engineer/producer by telling them which ones were your favorite takes.
In conclusion, with the right equipment and techniques, you can achieve a professional sound that matches or even exceeds what you would get in a commercial studio. This not only saves you money but also gives you the freedom to experiment with your music without any time constraints. Whether you're a singer-songwriter, a rapper, or a producer, mastering the art of home recording is an essential skill that can take your music career to the next level. Go practice, experiment, and believe in yourself!
Feel free to leave a comment if you think there’s other information I’m missing! Thank you :)
